Showing posts with label Meat. Show all posts

Sunday, November 20, 2011

Turkey Day 2011: Reflections and Recipe Rundown

Part one of the spread from Thanksgiving 2009
Thanksgiving is less than a week away, and I'm giddy with excitement the way that children look forward to Christmas morning.  I believe with steadfast resolve that Thanksgiving is the best American holiday of the year.  Worldwide, I think it might be either tied or a close second to Guy Fawkes Day, but if we're talking strictly non-pyrotechnic food-centric holidays, Thanksgiving is tops.

Why?  Because despite it's dubious beginnings, Thanksgiving these days is about celebrating time spent with your loved ones and preparing a fantastic meal together, and there is really nothing that can top that.   Unlike other feast days, there aren't any religious overtones, pressure for perfect gift-purchasing, and every family can make up it's own traditions.  No family that you can visit? Thanksgiving spent with friends is an equally special experience.

My parents live in Boston, and since Thanksgiving Eve is notoriously the worst travel day of the year, I usually like to go up early Thursday morning and have my own personal cook-off at home for my dishes the night before.  This year, my sister has goaded me into participating in a gratuitous athletic display on Thanksgiving morning.  Since I also have a zero vacation balance, I will braving the masses on Wednesday evening, sweating/panting Thursday morning, and going to be completely deprived of cooking time

But I'm not going to leave you gentle Trash Salad readers high and dry.  I've prepared a rundown of my favorite dishes that I've made over the years.  As a parting pro-tip: do not waste your cooking time or valuable stomach space on soups and breads.  You've got all of winter ahead of you for that.

Thanksgiving 2009's stuffing-heavy spread.  Courtesy of my sister for these photos, but Trash Salad worthy nonetheless.

Tried and true traditional flavors:
AllRecipes Yummy Sweet Potato Casserole
Serious Eats Classic Sage and Sausage Stuffing (I'm actually supremely fussy about my stuffing, but this is the recipe that comes closest to what I usually do, though eggs are completely unnecessary. Stuffing post forthcoming.)
Simply Recipes Perfect Mashed Potatoes
Gourmet Cranberry Sauce 
Cambell's Green Bean Casserole (My Mom's version has lots of cheese, completely canned ingredients, and is absolutely amazing.)
Martha's Roasted Brussels Sprouts
Tyler Florence Oven Roasted Turkey with Sage Butter
Libby's Famous Pumpkin Pie
Jell-o Chocolate Pudding Pie (Another family favorite!)


A little something different:*
My Coconut and Ginger Sweet Potato Casserole
Bon Appetit Lemon Roast Potatoes
My Kale Salad
Williams-Sonoma Spiced Cranberry Chutney
Dave Lieberman Tangy Almond Green Beans
101 Cookbooks Shredded Brussels Sprouts and Apples
Giada de Laurentis Turkey with Herbes de Provence and Citrus
Oprah's Pumpkin Gingersnap Pie with Sugared Cranberries (I know. But it's really good!)
Alison Kave's Blue Ribbon Ginger Bourbon Pecan Pie

*Having tried many stuffing variations including cornbread and wild rice, this is the only place where I will say do NOT mess with the classic.

Monday, July 11, 2011

Garlic Scape Salsa Verde


I love a good food challenge, and if I had a more stable existence that allowed me to cook for multiple people every night, a CSA-share would be perfect.  I actually signed up for a 6-week one a few years ago which unfortunately coincided with being sent to work in Buffalo for a month.  I remember flying back and forth on the weekends with carry-ons full of beets and radishes, and the effort of trying not to waste anything was rather stressful.

So in lieu of this and more in line with my erratic lifestyle during farmers market season, I like to play a game where I buy something that I'm completely unfamiliar with and figure out how to make something delicious out of it.  And this week's subject was garlic scapes at the bargain price of 8 for a dollar.  You know that little green shoot that happens when your garlic is too old?  If it's growing in say, soil for a few months instead of your pantry, you'll have a garlic scape.  Kind of similar to a skinny, twisty green onion but harder and more pungent.

And when combined with summer herbs and a dose of heat, garlic scapes make a fantastic salsa verde. It's garlicky (but not overly so), it's bright and spicy, it's awesome.  I adapted a recipe from for the love of yum who suggests grilling the stems for 15 minutes to get a nice char beforehand, but I was hungry and lazy and didn't want to heat up my kitchen more than necessary so skipped this step.  I also left it a little chunky because it adds an element of risk to possibly have something stuck between your teeth which I enjoy.  I served the salsa on seared tilapia fillets with an asparagus, cucumber, tomato, and feta salad, but I think the sauce would be equally good as a topping for tacos or scrambled eggs.


Garlic Scape Salsa Verde on Seared Tilapia
Inspired by for the love of yum


Makes 1 1/2 cups (350mL)
Total time: 20-30 minutes (all active)

For the salsa:
  • 8 garlic scapes
  • 1/2 a bunch of cilantro, leaves and stems
  • 1/2 a bunch of basil, leaves and stems (this was a smaller bunch)
  • 1 jalapeno with the stem removed
  • juice of 1 lemon
  • salt and pepper to taste
  • 1/3-1/2 cup (80-120mL) olive oil 
  • water to loosen (maybe 1/4 cup)
  • 2 teaspoons honey (optional)
For the fish:
  • butter
  • a few fillets of tilapia (or other white fish)
  • salt and pepper to taste
  • garlic scape salsa verde
Salsa Verde:  Roughly chop the scapes, herbs, and jalapeno (including the seeds if you're bold) and add to a food processor with the lemon juice and a big pinch of salt and pepper.  Pulse a few times to break things down, then add the olive oil while the processor is running.  Process for a few minutes, adding splashes of water to loosen if necessary until everything is broken down into a saucy consistency.  Taste and add more lemon juice, salt, or pepper if needed (I used a particularly spicy jalapeno so used 2 teaspoons of honey to mellow things out).

Fish:  Melt a small knob of butter in a heavy pan over medium heat.  Rinse tilapia and pat dry with a towel.  Season both sides with salt and pepper.  When the butter has started to brown, add the fish to the pan and cook for 1-3 minutes (depending on how thick your fillet is) until browned on one side.  Flip and sear for 1-3 minutes until browned on the other side.  Top each fillet with about 2 tablespoons of garlic scape salsa verde.

    Tuesday, April 12, 2011

    Repurposing Leftovers: Trash Fried Rice


    I had a reader request recently (I know!) for a post on ideas for reusing leftovers.  Yes, there have been many times in my past where I was perfectly content to eat spaghetti bolognese or black bean quesadillas five nights a week, but I like to think that my palate has sophisticated to the point or requiring a bit more day-to-day variation.  Fortunately, this doesn't have to take any more time than reheating a meat sauce, and as an added bonus you don't have to scrape red sauce off of every surface in the microwave.

    By boiling up a big pot of staple ingredients that take some time to cook (rice, pasta, beans, etc.), you can mix and match with different flavors throughout the week with just the time of a 10-minute stir fry.  Every time I make some meal with multiple components, I tend to keep them separate as leftovers for this very purpose.  Starches also tend to keep better when they are on their own without being left to soak up juices and get mushy.


    So, it's in this vein that I present fried rice, the first of a lazy series of repurposing leftovers as I have them.  You really need leftover rice for this recipe (or better yet, rice that's sat in the pot/cooker overnight to dry out), and it is incredibly easy, filling, and delicious.  Also completely customizable to whatever you happen to have in the fridge.  Not authentic at all of course, but it uses one pot instead of the nonsense of cooking everything individually - perfect for a quick midweek meal.

    And in the interest of full disclosure, this picture is of pearled barley and not rice, but the barley actually holds up to the frying pan a bit better than rice does.  Who knew?


    Trash Fried Rice

    Serves 2-4
    Total time: <15 minutes

    • 1 tablespoon oil
    • 1/2 onion, cut in half and sliced
    • 1 clove garlic, minced
    • 1 small knob ginger, minced
    • 1 teaspoon 5-spice powder (optional)
    • 1 cup protein, diced (tofu, beef, chicken, pork, shrimp, anything that won't fall apart)
    • 1 cup vegetables, chopped (anything goes here, fresh/frozen/canned: peppers, broccoli, peas, mushrooms, green beans, cabbage, greens, shredded carrots, celery)
    • 2 cups dryish cooked rice (white, brown, jasmine, or pearled barley)*
    • 2-3 tablespoons salty sauce (soy, fish, teriyaki, or oyster)
    • 1-2 tablespoons wine (Chinese, white, or cooking sherry) or water
    • 1 tablespoon Sriracha (optional)
    • 1 teaspoon sesame oil (optional)
    • chopped scallions, peanuts, and cilantro (optional garnishes)

    Heat oil in a heavy pan over medium heat.  Cook sliced onion until softened (about 5 minutes) and add garlic, ginger, and 5-spice (if using).  Add protein and cook until lightly browned (another few minutes).

    Add vegetables and cook for a few minutes until softened (if using fresh veg, just heat through if it is frozen or canned).  Stir in rice until well mixed, breaking up any clumps with a spoon.   Make a well in the center of the pan** and add the salty sauces, wine/water, and Sriracha (if using).  Quickly mix the sauces together with a spoon and then distribute throughout the rice mixture.  Cook for another few minutes until the liquid is evaporated or absorbed.

    Remove pan from heat, drizzle with sesame oil, and add garnishes as desired.


    * As a lighter variation with the same bulk, substitute half or 2/3 of the rice with shredded cabbage.

    ** You can also crack an egg in the well at this point, but scramble it in the space briefly before mixing in with the rice.

    Wednesday, April 6, 2011

    PATH Clam Chowder


    On my way home from the city on the PATH train Saturday night, I found myself in a conversation about clam chowder nuances with an intoxicated Yankees fan.  Still not sure how it came to that, but the outcome was a realization that though I love clams and I love soup, I have never made clam chowder because I am used to traditional New England versions with recipes like this one which seems to defy the laws of volume by featuring more than 500 calories and and 30g fat per one-cup serving.

    Manhattan clam chowder?  Kind of always seemed like a sacrilege in the vein of Canadian bacon and savory oatmeal (sorry Bittman, not on board).  But then I got to thinking about doing a lighter NE version, and maybe mixing it with the tomatoey NY soup to make something with the consistency of a light seafood stew but the flavor of pasta vodka.  I bounded out of bed on Sunday morning with clams on my mind, dead set on making this a reality.

    Now, would this be better with fresh clams?  Probably.  But here is a visual aid for cost comparison purposes:


    The "Worth it?" vector represents my enthusiasm to make a particular recipe.  The greater the distance above the "worth it?" vector a dish lies, the greater its perceived success will be once cost is taken into consideration.  You'll notice that up to the $10 mark, something can even rate poorly on objective deliciousness, however my perception will be extremely enjoyable since it cost so little.  Once the $15 mark is reached (my typical restaurant decision making price-point), the "worth it" vector rapidly plateaus.

    One dozen fresh little-neck clams is approximately equivalent to one 6.5oz can for recipe substitution purposes, and Shop Rite prices rang in at $5.50/dozen versus the most excellent deal of three 6.5oz cans for $4.  So even if the fresh clams score an 8 in objective tastiness, a full point above their canned counterparts, the perceived tastiness of the canned clams is at least double.  Add to that the proportional effort of opening four cans versus steaming and shucking 48 clams and, well, there wasn't even a choice to be made here.

    Right.  So now that's thoroughly justified, onto the soups.  Both of these are delicious on their own as well as mixed together, however the pink clumpy soup doesn't make for a super appetizing photo.  Serve these concurrently in a delicately swirled pattern and sell the combination as peace in the northeast.

    At least with chowder - not baseball obviously.


    PATH Clam Chowder
    Cobbled together from Food Network, Martha Stewart, and Gourmet recipes and heavily adapted

    If you made these at the same time, you can just drain the bacon grease from the first pot into the second and chop all the veggies at once.  It doesn't really take any more time than one or the other.

    Manhattan Clam Chowder
    Makes about 2.5L
    Total time: 60 minutes (Active time 20)

    • 2 strips of bacon, chopped
    • 1/2 large onion, diced
    • 3 stalks celery, diced
    • 2 medium carrots, diced
    • 1 clove garlic, minced
    • 1 teaspoon dried oregano
    • 1 teaspoon dried basil
    • 1/4-1/2 teaspoon cayenne pepper (optional)
    • 1/4 cup (60 mL) white wine
    • 2 x 6.5 oz (185g) cans of chopped clams in juice
    • 28 oz can (800g) of whole tomatoes in juice
    • 1 large potato, scrubbed and diced (about 3/4lb/340g)
    • 1-2 cups (1/4-1/2L) low-sodium veggie or chicken stock
    • chopped parsley (optional)
    • salt and pepper

    Spray a large pot with oil and add the bacon, spreading the bits out over medium heat.  Cook, stirring occasionally, until the bacon bits are crispy and the fat is rendered out, about 15 minutes.

    Chop the vegetables while the bacon is cooking.  Remove bacon from the pot when it is crispy and set aside.  Drain all but 1 tablespoon of grease and add the onion, celery, and carrots and cook until starting to brown (5-7 minutes).

    Add garlic, oregano, basil, cayenne (if using), and white wine.  Stir to scrape up any browned bits.  Add juice from the clam and tomato cans and add the tomatoes, breaking them up by hand.  Add the potatoes and enough stock to cover them.  Simmer on medium heat until potatoes are cooked (about 20 minutes).

    When potatoes are tender, add clams, bacon bits, and parsley (if using) and stir to heat through.  Season to taste with salt and pepper.


    Slightly Lighter New England Clam Chowder
    Makes about 1.5L
    Total time: 45 minutes (Active time 20)

    • 2 tablespoons bacon grease/butter/olive oil
    • 1/2 large onion, diced
    • 3 stalks celery, diced
    • 1/4 cup (30g) flour
    • 2 x 6.5 oz (185g) cans of chopped clams in juice
    • 2 cups (1/2L) milk
    • 2 bay leaves
    • 3 small potatoes, scrubbed and diced (a little over 1 lb/500g)
    • 1-2 cups (1/4-1/2L) low-sodium veggie or chicken stock
    • 1 tablespoon red wine vinegar
    • salt and pepper

    Heat fat in a large pot and saute onions and celery over medium heat until softened, about 5-7 minutes. 

    Sprinkle flour over onions and celery and stir until well-coated.  Add juice from the clams and milk and stir to combine.  Add the potatoes and enough stock to cover them, and simmer on medium heat until potatoes are cooked (about 20 minutes).

    When potatoes are tender, add clams and vinegar and season to taste with salt and pepper.

    Wednesday, March 30, 2011

    Trash Tuna Burgers and Eating Down the Fridge


    This post is inspired my roommates, who are wonderful people and fantastic to live with, but are also 90% useless when it comes to cleaning out the fridge.  However, I think this works out well for me more often than not, since I can rescue food that the original purchaser has long since forgotten. 

    Prime example: last night's dinner of tuna burgers constructed of things I am sick of looking at in the fridge.  There have been a few vacuum sealed packets of tuna languishing in the refrigerator door for at least a year, along with three or four different bottles of blue cheese dressing, two half-moldy lemons, exorbitantly old capers, and several baggies of breadcrumbs that I've made from salvaged stale bread.  Bam!  Dinner.


    Trash Tuna Burgers with Tartar Sauce

    Makes 4-6 burgers
    Total time: 20-30 minutes (Active time 10-20 minutes)

    For the burgers:
    • 12 oz (350g) tuna, canned or vacuum sealed in water, flaked and divided in half
    • 2-3 tablespoons blue cheese dressing (or mayo)
    • 1 tablespoon dijon mustard
    • 1 large egg
    • juice and zest of half a lemon
    • 1 clove of garlic, minced
    • 2 tablespoons capers (optional)
    • small handful of fresh dill (or parsley), chopped (optional)
    • 1 cup (150g) homemade breadcrumbs (just grind up a few stale pieces of bread in a food processor)
    • 2 teaspoons onion powder (or 1/2 a small onion, minced)
    • salt and pepper and hot sauce to taste
    • 1-2 tablespoons oil
    For the sauce:
    • 1/3 cup ( 80mL) blue cheese dressing (or mayo)
    • juice and zest of half a lemon
    • 1 medium-sized barrel pickle, minced

    Combine half of the flaked tuna with blue cheese dressing/mayo, mustard, egg, lemon juice and zest, garlic, capers, and herbs in a medium bowl and mix well.  Add the rest of the tuna, breadcrumbs, onion powder/onion, and other seasonings and stir until just-combined (do not over mix).  Form into 4-6 patties.

    Heat oil in a heavy skillet and grill patties for roughly 5 minutes on each side until browned.

    Combine sauce ingredients in an empty jar and give a good shake.

    Serve patties with sauce on bread (or not) with something fresh and green.

    Wednesday, March 9, 2011

    Sausage Rolls, Two Ways

    The end of March is going to mark the first year of my Hoboken residence, and this past weekend marked my first Hoboken St. Patrick's Day.   This fake holiday is oddly celebrated 2 weeks early with a parade and, more importantly, a city-wide party commencing at 7am and lasting until everyone passes out.  I wasn't sure what to expect having read the news articles, but I guess it was everything I had imagined and more.  My apartment hosted since it is rather perfect for fake holiday revelry: far enough away from the main drag to avoid the melee, and also has a lovely backyard for grilling and other important activities to usher in spring.


    In certain more idyllic places than New Jersey, it ain't a decent party unless sausage rolls make the rounds.  I internalized this philosophy because sausage rolls are a perfect pair to drinking beer outside wherever you are.  Pastry-covered delicious meat bites eaten by hand with tomato sauce/ketchup, these puppies are definitely messy but line the stomach suitably in case you are inclined to actually start drinking green beer at the crack of dawn.

    Now, I didn't make the pastry from scratch, but these are still quite a bit more work than your more convenient frozen options which are available if you're lucky enough to live in a Commonwealth country.  But as is the case with most homemade treats, you'll be handsomely rewarded if you put in the time.  These sausage rolls are much more flavorful than the frozen versions and are completely customizable to any number of seasonings you might have on-hand.

    The successful hostess also tries to cater to food allergies and preferences, hence the two onion-free-meat and vegetarian variations presented here.  The vegetarian one actually does taste and look remarkably like meat, who knew?

    Unfortunately a successful hostess also focuses on feeding and watering guests and not on taking blog photographs.  The above scene is all that was left of the sausage rolls on Sunday, so I think that speaks for itself.


     Sausage rolls in profile, what they actually looked like.
    Image via Deliaonline.com

    Sage and Apple Sausage Rolls
    Adapted significantly from Delia


    Makes enough for a crowd
    Total time: 1 hour (Active time 30-40 minutes) 
    • 1 lb (450g) sausage meat, casings removed
    • 1 lb (450g) lean ground pork
    • 2 small granny smith apples, peeled and grated (or 1 small apple and 1/2 small onion)
    • 2 cloves of garlic, grated
    • 2 teaspoons dried sage 
    • 2 tablespoons Worcestershire sauce
    • 2 teaspoons Dijon mustard
    • handful of fresh parsley, chopped
    • big pinch of salt and pepper 
    • 2 sheets puff pastry (450g), thawed 
    • beaten egg 
    • sesame seeds (optional)

    Mix meat, apples, and seasonings in a large bowl until just-combined.

    Roll out puff pastry on a floured surface until you have a rectangle about 12 x 16 inches (30 x 40 cm).  Cut each sheet in half lengthwise so you have two rectangles about 6 x 16 inches (15 x 40 cm).  Spoon 1/4 of the meat mixture over one edge of the pastry and brush the other side with beaten egg.  Fold pastry over the meat mixture and pat down to ensure the roll is closed; repeat with the other three sheets of pastry.  Whole rolls can be frozen at this stage in plastic wrap and thawed before continuing below.

    Brush beaten egg over the top of each roll and sprinkle with sesame seeds (you will probably use about 2 tablespoons total).  Cut each roll with a sharp knife into 1/2 inch-1 inch pieces (1-2 cm) and stab the top of each a few times to let out steam.

    Evenly space roll pieces on parchment paper-lined baking sheets and bake for 20-25 minutes at 400F (200C) until browned; you will need more than one sheet.

    Unbaked rolls can be refrigerated layered on wax paper in containers overnight, or flash-frozen on the parchment paper for one hour, then transferred to plastic bags.


    Image via smallmagazine.typepad.com

    Vegetarian Sausage Rolls
    Adapted from smallmagazine

    Makes enough for a crowd
    Total time: 70 minutes or so (Active time 40-50 minutes)

    • 3 eggs
    • 2/3 cup (80g) roughly chopped nuts (I used half walnuts, half pecans)
    • 1 cup (80g) rolled oats
    • 1 medium onion, roughly chopped
    • 1 clove garlic, roughly chopped
    • 1 cup (250g) cottage cheese
    • 2 tablespoons soy sauce
    • handful of fresh parsley, chopped
    • 2/3 cup (55g) breadcrumbs
    • 1 cup (115g) shredded cheddar cheese
    • 2 sheets (450g) puff pastry, thawed
    • beaten egg
    • sesame seeds (optional)

    Combine 3 eggs, nuts, oats, onion, garlic, cottage cheese, and soy sauce in the base of a food processor.  Process until well-mixed, about 1 minute or so.  Transfer mixture to a large bowl and stir in breadcrumbs and parsley.

    Roll out puff pastry on a floured surface until you have a rectangle about 12 x 16 inches (30 x 40 cm).  Cut each sheet in half lengthwise so you have two rectangles about 6 x 16 inches (15 x 40 cm).  Spoon 1/4 of the mixture over one edge of the pastry and top with 1/4 cup of cheese.  Brush the other side of the pastry with beaten egg and roll over the oats mixture.  Pat down to ensure the roll is closed and repeat with the other three sheets of pastry.  Whole rolls can be frozen at this stage in plastic wrap and thawed before continuing below.

    Brush beaten egg over the top of each roll and sprinkle with sesame seeds, if using (you will probably use about 2 tablespoons total).  Cut each roll with a sharp knife into 1/2 inch-1 inch pieces (1-2cm) and stab the top of each a few times to let out steam.

    Evenly space roll pieces on parchment paper-lined baking sheets and bake for 20 minutes at 350F (180C); you will need more than one sheet.

    Unbaked rolls can be refrigerated layered on wax paper in containers for a few days, or flash-frozen on the parchment paper for one hour, then transferred to plastic bags.

    Wednesday, March 2, 2011

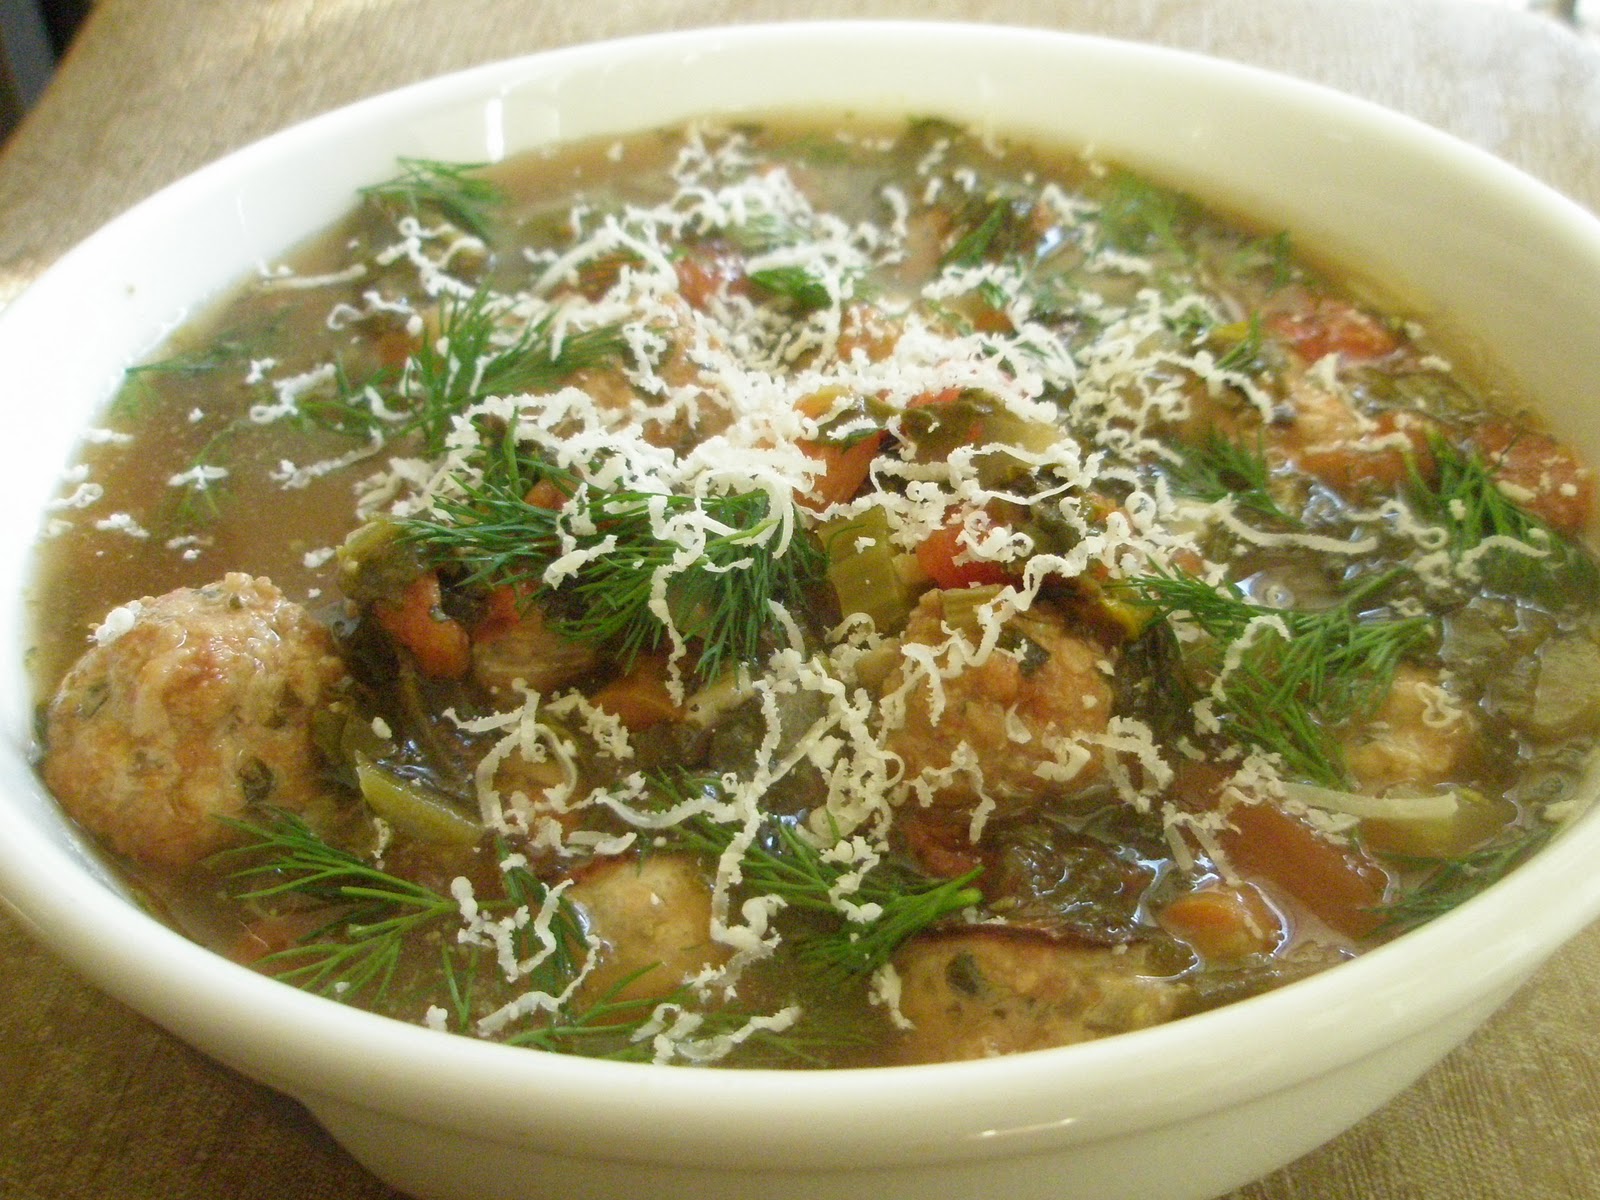
    Marginally Healthier/Completely Bastardized Italian Wedding Soup


    I've been having some serious meatball cravings lately, but the weather is giving me the nagging sense that beach season is not that far away after all.  And unfortunately, the ideal way to eat meatballs is soaked with a luscious, rich tomato sauce and nestled in spaghetti or a soft white roll, covered in cheese.

    I tried to capture the most awesome flavorful qualities in the meatballs, but presented on a healthier platform of soup and made 100% with things I had in the freezer/pantry.  Italian wedding soup is the clear go-to for this type of dish, but most versions are too brothy, salty, or filled with overcooked gobs of tiny pasta.  I hemmed and hawed for awhile about adding another starch here, but by the time the meatballs were in the vegetable base, it was thick enough already (though I still want to try a version with lentils).

    The most ironic part of this endeavor is that the recipe closest to what I wanted was Ina Garten's.  I had ground turkey on hand so had to tweak the meat and stock ingredients quite a bit to add more flavor, but I really liked the idea of baking the meatballs instead of frying.  It takes a lot less effort since you don't need to stand over the stove and also some of the fat bakes out so you're not left with an overly slick soup.

    I also added some diced tomatoes in a last ditch effort to channel the meatball subs of my dreams.  This makes a great filling lunch and, if anything, is certainly a lot less messy to eat at work than a traditional Italian dinner.


    Marginally Healthier Italian Wedding Soup
    Adapted from Ina Garten

    Serves 6-8
    Total time: 1 hour (Active time 45 minutes)

    • 1.25 pounds (550g) lean ground turkey 
    • 2/3 cup bread crumbs
    • 2 cloves of garlic, grated
    • 1/2 small onion, finely diced
    • handful of parsley leaves, chopped
    • 1/2 cup (2 oz/50g) freshly grated hard cheese (I used pecorino romano)
    • 2 teaspoons dried sage (optional, thyme/basil/oregano would also be good)
    • 1 large egg beaten with a splash of milk
    • 1 tablespoon Worcestershire sauce
    • 1 teaspoon Dijon mustard
    • big pinch of salt, ground pepper

    • 1 tablespoon olive oil
    • 1 large onion, diced
    • 2 large carrots, diced
    • 3 stalks of celery, diced
    • 1 clove of garlic, grated
    • 1 bay leaf
    • 1 teaspoon dried basil
    • 1 teaspoon dried oregano
    • splash of white wine
    • 28 oz (800g) can of diced tomatoes in juice
    • 10 oz (280g) brick of frozen spinach, thawed in the microwave
    • 4 cups/1L vegetable broth (cubes are fine, but homemade is better)
    • 4-6 cups/1-1.5L water
    • fresh chopped dill, crushed red pepper, grated hard cheese (for serving)

    Preheat oven to 350F/180C and line two baking sheets with parchment paper.  Add first set of ingredients in a large bowl and mix gently with your hands (or a spoon but this takes longer).  Form meat mixture into small balls about 1/2"/1cm in diameter (roundness is not crucial here); you should have about 60-70 total.  Bake for 15-20 minutes until lightly browned.

    While meatballs are baking, heat olive oil in a large pot and saute onion, carrot, and celery until softened (about 5-7 minutes).  Add garlic, herbs, and a splash of white wine and cook for an additional minute or two while you get the liquid ingredients ready.  Add tomatoes and their juice, spinach, vegetable broth, and 4 cups/1L water and heat to a simmer.

    Add meatballs when they are finished baking and heat through.  If too thick for your liking, add an additional 2 cups of water.  Taste and re-season if necessary with salt and pepper.  Serve with chopped dill, red pepper, and cheese, if using.