Showing posts with label Trash. Show all posts

Sunday, December 2, 2012

Sandy: Executions of Refrigerator Contingency Plans and Lessons Learned


So we're now a month out from megaultradestructostorm Sandy kicking the tri-state area in the teeth, leaving a blood-spattered trail of incisors and vomit in her drug-addled wake.  Hopefully you expose yourself to some media other than the Bravo and E! networks and are not learning about this for the first time here.

Am I going to talk about the post-surge destruction, public health hazards, and the struggle to rebuild?  The flooding and devastation that disproportionately affected the elderly and low-income residents in my town?  Not even going to mention the creative generosity of area volunteers that have rallied to assist those in need.

Nay, the issue that has prompted me to emerge my half-year Trash Salad sabbatical is that of resourcefulness and preservation in a time of crisis.  By which I mean, what do to when your fridge loses power, and how to prepare for this in the future.

To refamiliarize you with the Sandy timetable, the storm rolled in on Monday afternoon, taking out the nonsensically above-ground power lines by Monday night.  As many who sat back with rolled-eyes during Irene, I had assumed that either I wouldn't lose power at all, or in the worst-case scenario, that being connected to the same grid as the main commercial district in town would make for a limited powerless period.  Cut to five days later: I'm freezing in the dark, compulsively eating down the fridge, and am otherwise devolving into a late-1940s Howard Hughes situation.

Living on the fifth floor outside of a flood-zone, I was very very lucky.  Some folks lost everything, including loved ones.  But also heart-breaking?  The people who were totally unprepared for a power loss, not knowing how to feed themselves without delivery.com at their beck and call.  Sure the clock starts running when the power goes out, but does that mean immediately throwing everything out?  Absolutely not.  You can survive and thrive on decaying food, if you approach it strategically.

So behold, an overview of how I lasted through week without spending a single dollar in the dark and post-apocalyptic wasteland (before I lost my mind and hopped a bus out of town):


Friday:  A non-work day.  Frankenstorm is a mere buzzword at this stage.  Access to a car on an empty stomach begets a $200 trip to Trader Joes, including several bags full of frozen food.  You may have guessed that this will soon reveal itself as an unwise move.

Saturday/Sunday: Standard weekend of costume party booze cruise coupled with a lazy SVU-marathon hangover day.  Work for Monday is called off.  I make hurricane preparations by organizing scented candles, locating matches, and grinding up all of my coffee beans.  Priorities!

Monday:  Stuck at home with a city-wide curfew, I determine the best way to cope with being cooped up is via four thousand hours of Netflix and elaborate kitchen projects.  Down all of my yogurt and milk by way of chocolate granola.  Focus on the current MVP of the freezer, an organic chicken (flat roast day!), but an initial power loss around 3pm before it properly defrosts foils the plan.  Power comes on briefly and we take advantage of it to organize a responsible vegetable lasagna and salad.  Spend the rest of the evening listening to jock jams with vodka sodas by candle-light while the storm rages on.

Tuesday: Alone, day 2 sans electricity, and now without any cell phone service (ugh AT&T).  I sleep until, who knows, 11?  Thank god for gas stoves and the french press.  Reality sets in, and I sit down and prioritize the fridge situation: the super perishables include the chicken of gold, turkey burgers, random bits of meat and veg, frozen pork dumplings, almond milk, mozzarella, and hummus.  Breakfast of turkey burgers and salad (there is no space for carbs in a situation this dire).  I go for a long walk to scope out the situation.  It's WAY worse than anticipated.


The chicken must be dealt with.  I sear it in a cast iron pan and pop it in a pot on top of chunked up onions, parsnips, carrots, and cabbage and leave it on low for an hour or two.  Cooking a chicken in by candle light is challenging to say the least.  I feast on my chicken and chicken-fat vegetables and leftover salad with hummus, listen to WNYC, and contemplate how not dissimmilar the situation is to a zombie apocalypse

Wednesday:  Still no power, and man it's starting to get cold.  Breakfast of more chicken and chicken-fat veg that sat out on the counter overnight so I wouldn't have to open the fridge.  Think I'll go out and get power and internet at Starbucks, but get word that the ENTIRE city and even bordering areas are under powerless lockdown.  Question the nature of existence in this electrically-deficient wasteland. 

But then I get a surprise visitor!  And my first reaction is disappointment that he has brought a cooler containing the super perishables from his own fridge: jersey shore crab cakes, edamame, a thousand veggie burgers, and half a pizza.  Oy!  We experiment with cooking a mammoth crab cake in a cast iron pan.  It become a weirdly dense crabby pancake.  A delicious late lunch with sides of chicken and pizza.  It occurs to me that the survival diet is rather calorically dense, but that I will need those calories to outrun the zombies.

We go for another long walk to survey the scene, the only available activity these days.  The sewage water does not appear to have receded at all from the day before.  Discover that we can get cell service near the water, so use my remaining cell battery for a facebook life update (priorities).  We cook the remaining crab cakes back at camp, and I make a giant pot of stock with the chicken carcass.  Sides of veggie burger/edamame stirfry surprise.  Hey, it's halloween!  We celebrate by more WNYC and whiskey by candle light.

Thursday: This morning the building has started to develop a terrible smell from the rotting food in the restaurant refrigerators in the basement.  Apparently they had a large stock of seafood.  Ugh.  Haven't seen or heard a soul in the building all week.  Where does everyone go when there is no transportation infrastructure or way to get gas?  Fancy breakfast today of crab cake hash topped with an egg and mozzarella.  Second breakfast of dumplings.  I stop worrying about opening the fridge since all coolness is completely gone.  But what if we're not able to finish the crab cakes before they go off?  This thought causes an inordinate amount of stress.  I'm absolutely losing it.

On the daily long walk, I encounter several sets of family members and get an answer to my earlier question: mom and dad have come to fetch all the babies.  Piles of garbage have started to accumulate everywhere as folks start cleaning out their businesses and ground floor apartments.  The National Guard is rolling past rescuing folks from building still surrounded by sewage water.  I have conflicting emotions of feeling incredibly lucky and absolutely losing my mind.  Power appears to have come back along two blocks to the northwest so I head over to join a "juicing party": a new social experience of shared power outside the homes of generous individuals who extended power strips for the wandering refugees.  I catch up on my correspondence for a few hours before my fingers freeze up and I am forced back into my dark and stinky garbage apartment.

The cooking by candle-light project this evening is about three gallons of Meat Trash Soup which consists of everything left in the fridge (soy chorizo, kielbasa, rashers of bacon, chicken carcass stock, frozen spinach bricks, cabbage) topped with cod fillets.  The fish was seriously questionable, but I lemoned and garlicked the hell out of it until the funk was gone.

Friday: Woke up with some serious depression upon realizing nothing had changed, yet pleasantly surprised to have not become sick from the fish the night before.  Leftover trash hash for breakfast featuring the rest of the crab cakes, veggie burgers, a pepper, and a very sad attempt at pan-fried tater tots that were super soft and greasy.  I think the failed tot experiment was the final straw in whatever remaining sanity I had at this point, because shortly after breakfast I heard the buses running outside and promptly formulated a plan to pack everything up and get the hell out of dodge.

Some seriously sad tots.
I scooped up and salvaged: unopened packages of smoked salmon, goat cheese, tempeh, and pre-cooked sausages, several meatless frozen pizzas (that were surprisingly just fine when baked up!), hard cheese, a pound or two butter, and the remainder of the meat soup.  Did I feel like a foolish bag lady schlepping all of that on the bus? Sure, but I'm positive the stress of leaving it would have been worse. 

For some lessons learned:

1) Know your utility situation.  Gas stoves and hot water heaters seem way more robust than anything involving electricity, but only if you know how to light a burner without an electric starter.  Is this knowledge that is going the way of the stick shift?  Similarly, go get yourself a french press if you don't have one already.  Even if you don't have a gas stove you can still make cold-brewed coffee happen.

2) Take a picture or make a list of your fridge contents and make a plan.  I prioritized with an algorithm of what was most expensive/what was going to go bad first.  Things loaded with preservatives were just fine, even five days later.  As a consequence I only had to chuck maybe $10-15 total of frozen fruit, a couple of waffles with the the structural integrity of pudding, a spinach pie, and a wedge of brie that was a million years old.  Under normal circumstances the brie would have been fair game, but I was so cheese/saturated fatted out by that stage that I couldn't even look at it by the end of the week.

3) Get to know your neighbors - more specifically, their skill sets and resources.  It's much easier to knock on a door and ask for help (even help eating down the fridge) if you've at least introduced yourself ahead of time.  Further to this, I need to maybe move to a place where the community has an average age above 22 and everyone doesn't skip town the second they lose power.

So there we have it.  If I could do it again, I would do it all the same, but will for the future always maintain a larger stockpile of alcohol on hand.  Whiskey never goes bad!

Friday, February 3, 2012

Winter Veg and Grain Trash Soup


It's pretty rare that I reach for a recipe to cook from twice, especially something as adaptable and forgivable like soup.  A repeat of this Orangette vegetable soup was probably more due to curiosity than anything else - how could something so simple be so delicious?

Fortunately for you all, I'm a regular Poirot and deduced the secret in no time: good stock, fresh herbs, and cubed winter veg.  And by "fresh herbs," all I mean not the dried kind, since I'm still using up my mammoth bunches from Thanksgiving that are having some bronze age discoloration issues (but taste fine).  Otherwise, the recipe lends itself well to tinkering and veg-drawer cleaning, incorporating all of the bits and pieces lying around your fridge into a real snuggie of a stew that you actually want to eat, even though it's incredibly healthy.

So tinker to your heart's desire.  I originally made this with the proper leeks, parsnips, and cabbage, though the second version with turnips, butternut squash, and kale was a little more sweet and bitter. I probably wouldn't do all potatoes since it would be too starchy, but otherwise let your fridge contents be your guide.


Because this time of year we can all use a little redemption, can't we? I, for one, am still recovering from my second annual trip to the Beer, Bourbon, and Barbecue festival.  So stay tuned for lots more on the vegetable front.


Winter Veg and Grain Trash Soup
Inspired by Orangette


Serves 6-8
Total time: 45 min-90 min (Active time 10 minutes)


  • 2 tablespoons fat (olive/vegetable oil and butter are best)
  • 1 large onion, diced (any kind)
  • 3 or 4 ribs of celery, diced (OR the skinny core of the celery bunch, leaves included)
  • 3 skinny carrots, diced
  • 1(ish) pound (450 grams) mixed diced winter veggies, such as:
    • potatoes/sweet potatoes
    • parsnips, peeled
    • turnips/rutabagas
    • winter squash
    • leeks, the white/light green parts rinsed and thinly sliced
  • 3 large garlic cloves, minced
  • 1ish tablespoon fresh hard herbs (rosemary, sage, thyme, or a mix)
  • 1 ½ -2 liters (6-9 cups) low-sodium chicken or vegetable stock (veer towards the low end for a stew)
  • 2 bay leaves (optional)
  • Salt and pepper to taste
  • 1/4-3/4 cup (50-150g) uncooked grains such as (in order of cooking time): 
    • couscous
    • bulgur
    • small pasta
    • quinoa
    • white rice
    • pearled barley (best for chew)
    • farro
    • brown rice
    • wheat berries (will take at least an hour of extra cooking time)
  • Salt and pepper to taste
  • Few handfuls of shredded leaves such as:
    • savoy cabbage
    • brussels sprouts
    • kale
    • chard
    • spinach
  • To serve (optional): grated hard cheese, squirt of Sriracha

Heat the oil/butter in a large pot.  Add the onion, celery, carrots, and other winter veg, and stir to coat. Cook, stirring occasionally, for about 10-15 minutes, or until softened. Add the garlic, herbs, and a few pinches of salt, and cook for a few minutes more.

Add the stock bay leaves (if using) and bring to a boil, then lower to a simmer.  Stir in whatever grains you're using, and cook as long as indicated on the package (20 minutes for pearl barley [my favorite]), stirring occasionally. 

Finally add your shredded leaves, and simmer for 5 minutes more.   Taste, and add salt as needed. Serve with freshly ground black pepper, or gussy up with Sriracha and shredded cheese.

Monday, June 6, 2011

Repurposing Leftovers: Trash Noodle Soup


This dish was inspired by a lonely little container of rice noodles leftover from a Thai food order that I discovered in the fridge.  Noodles can sometimes be incorporated into stir fry situations if they're in good condition, but these were at least a week old and had congealed into a sort of stringy brick that would definitely not have held up to a frying pan.

The solution?  A brothy soup to rehydrate the noodles into an edible form, while delivering a delicious and healthy dinner.  This isn't really a recipe so much as a rough ratio of ingredients and flavoring suggestings since I don't think I've ever made this the same way twice.  And as I write it out, it's not unlike fried rice in it's basic components and adaptability.  The version pictured is miso/hot and sour flavored with tofu, cabbage, edamame, and some rehydrated black fungus I bought in Chinatown ages ago, though this dish certainly doesn't need to have asian flavors or ingredients if that's not what you have on hand.

Here are a few winning flavor combinations:
  • for bastardized minestrone: use 1 cup of white/kidney beans, 1/2 can of diced tomatoes in juice, a small chopped zucchini, fresh spinach, splash of red wine, oregano, basil, and finish with parmesean cheese
  • for simple, rustic, and healthy: sautee 1/2 a thinly sliced onion and 2 cloves of garlic before heating broth, use 1 cup of cooked chickpeas, a few handful of shredded green cabbage, and finish with a drizzle of tasty/expensive olive oil
  • for cheaters' thai: substitute half of the broth with a can of coconut milk, use shredded chicken or tofu chunks, mushrooms and red peppers, season with 1 teaspoon or so of green curry paste, fish sauce (start with 1/2 tablespoon), a lime wedge, and fresh cilantro
  • for quick and dirty pho: simmer broth with whole star anise and a cinnamon stick, serve hot broth over noodles and thinly sliced raw beef, and garnish with basil, mint, bean sprouts, and sriracha
  • for salty, hot, and sour (or the Chinatown special, a personal favorite): use rehydrated shiitake, black fungus, or seaweed, tofu chunks, frozen edamame pods, and green onions, seasoned with 2 tablespoons of miso paste mixed with an equal amount of warm water, a big squirt of Sriracha or other chile paste, and 1-2 tablespoons of vinegar

The only caveat I would add is do make this in small batches since it's best when eaten right away.  If it sits, the noodles keep absorbing more and more moisture until they completely disintegrate to turn your soup into a gelatinous mass of starch and veg.  Quick-cooking rice noodles are especially susceptible to this.  If you wanted to do a noodle soup lunch the next day, just keep the broth/meat/veg mixture separate and heat it with the noodles right before you eat it.  I know, I know, that makes two separate containers to wash and that's the worst.  But isn't it worth it for a (very nearly) free lunch?


Trash Noodle Soup

Serves 2-4
Total time: <10 minutes
  • 4 cups (1L) low-sodium stock or broth
  • 1 cup quick-cooking or pre-cooked protein (small chuncks of tofu, poached and shredded chicken, shrimp, and even white beans would work great)
  • 1-2 cups quick-cooking or pre-cooked vegetables, chopped (edamame, scallions, small broccoli/cauliflower florets, mushrooms, tomatoes, green beans, sprouts, cabbage, greens, or rehydrated random ingredients from Chinatown)
  • seasoning (see above)
  • 1-2 cups dry leftover noodles

Heat broth to a boil while you chop and assemble the rest of your ingredients.  Add protein and veg to simmering broth and cook 5 minutes or until heated through.  Add seasoning to taste.

When you're ready to consume: break up the noodle mass with your hands as much as possible and add to the broth.  Heat and stir until separated and resembling noodles, and serve immediately.

Tuesday, April 12, 2011

Repurposing Leftovers: Trash Fried Rice


I had a reader request recently (I know!) for a post on ideas for reusing leftovers.  Yes, there have been many times in my past where I was perfectly content to eat spaghetti bolognese or black bean quesadillas five nights a week, but I like to think that my palate has sophisticated to the point or requiring a bit more day-to-day variation.  Fortunately, this doesn't have to take any more time than reheating a meat sauce, and as an added bonus you don't have to scrape red sauce off of every surface in the microwave.

By boiling up a big pot of staple ingredients that take some time to cook (rice, pasta, beans, etc.), you can mix and match with different flavors throughout the week with just the time of a 10-minute stir fry.  Every time I make some meal with multiple components, I tend to keep them separate as leftovers for this very purpose.  Starches also tend to keep better when they are on their own without being left to soak up juices and get mushy.


So, it's in this vein that I present fried rice, the first of a lazy series of repurposing leftovers as I have them.  You really need leftover rice for this recipe (or better yet, rice that's sat in the pot/cooker overnight to dry out), and it is incredibly easy, filling, and delicious.  Also completely customizable to whatever you happen to have in the fridge.  Not authentic at all of course, but it uses one pot instead of the nonsense of cooking everything individually - perfect for a quick midweek meal.

And in the interest of full disclosure, this picture is of pearled barley and not rice, but the barley actually holds up to the frying pan a bit better than rice does.  Who knew?


Trash Fried Rice

Serves 2-4
Total time: <15 minutes

  • 1 tablespoon oil
  • 1/2 onion, cut in half and sliced
  • 1 clove garlic, minced
  • 1 small knob ginger, minced
  • 1 teaspoon 5-spice powder (optional)
  • 1 cup protein, diced (tofu, beef, chicken, pork, shrimp, anything that won't fall apart)
  • 1 cup vegetables, chopped (anything goes here, fresh/frozen/canned: peppers, broccoli, peas, mushrooms, green beans, cabbage, greens, shredded carrots, celery)
  • 2 cups dryish cooked rice (white, brown, jasmine, or pearled barley)*
  • 2-3 tablespoons salty sauce (soy, fish, teriyaki, or oyster)
  • 1-2 tablespoons wine (Chinese, white, or cooking sherry) or water
  • 1 tablespoon Sriracha (optional)
  • 1 teaspoon sesame oil (optional)
  • chopped scallions, peanuts, and cilantro (optional garnishes)

Heat oil in a heavy pan over medium heat.  Cook sliced onion until softened (about 5 minutes) and add garlic, ginger, and 5-spice (if using).  Add protein and cook until lightly browned (another few minutes).

Add vegetables and cook for a few minutes until softened (if using fresh veg, just heat through if it is frozen or canned).  Stir in rice until well mixed, breaking up any clumps with a spoon.   Make a well in the center of the pan** and add the salty sauces, wine/water, and Sriracha (if using).  Quickly mix the sauces together with a spoon and then distribute throughout the rice mixture.  Cook for another few minutes until the liquid is evaporated or absorbed.

Remove pan from heat, drizzle with sesame oil, and add garnishes as desired.


* As a lighter variation with the same bulk, substitute half or 2/3 of the rice with shredded cabbage.

** You can also crack an egg in the well at this point, but scramble it in the space briefly before mixing in with the rice.

Wednesday, March 30, 2011

Trash Tuna Burgers and Eating Down the Fridge


This post is inspired my roommates, who are wonderful people and fantastic to live with, but are also 90% useless when it comes to cleaning out the fridge.  However, I think this works out well for me more often than not, since I can rescue food that the original purchaser has long since forgotten. 

Prime example: last night's dinner of tuna burgers constructed of things I am sick of looking at in the fridge.  There have been a few vacuum sealed packets of tuna languishing in the refrigerator door for at least a year, along with three or four different bottles of blue cheese dressing, two half-moldy lemons, exorbitantly old capers, and several baggies of breadcrumbs that I've made from salvaged stale bread.  Bam!  Dinner.


Trash Tuna Burgers with Tartar Sauce

Makes 4-6 burgers
Total time: 20-30 minutes (Active time 10-20 minutes)

For the burgers:
  • 12 oz (350g) tuna, canned or vacuum sealed in water, flaked and divided in half
  • 2-3 tablespoons blue cheese dressing (or mayo)
  • 1 tablespoon dijon mustard
  • 1 large egg
  • juice and zest of half a lemon
  • 1 clove of garlic, minced
  • 2 tablespoons capers (optional)
  • small handful of fresh dill (or parsley), chopped (optional)
  • 1 cup (150g) homemade breadcrumbs (just grind up a few stale pieces of bread in a food processor)
  • 2 teaspoons onion powder (or 1/2 a small onion, minced)
  • salt and pepper and hot sauce to taste
  • 1-2 tablespoons oil
For the sauce:
  • 1/3 cup ( 80mL) blue cheese dressing (or mayo)
  • juice and zest of half a lemon
  • 1 medium-sized barrel pickle, minced

Combine half of the flaked tuna with blue cheese dressing/mayo, mustard, egg, lemon juice and zest, garlic, capers, and herbs in a medium bowl and mix well.  Add the rest of the tuna, breadcrumbs, onion powder/onion, and other seasonings and stir until just-combined (do not over mix).  Form into 4-6 patties.

Heat oil in a heavy skillet and grill patties for roughly 5 minutes on each side until browned.

Combine sauce ingredients in an empty jar and give a good shake.

Serve patties with sauce on bread (or not) with something fresh and green.

Sunday, March 27, 2011

Crunchy Millet Pumpkin Spice Trash Granola


As much as I love Garden of Eden for cheese, it fails me tremendously when it comes to other snacks.  Yesterday, for example, I spotted a 4-cup container of granola for $8.  Outrageous!

I baked this in vengeance after I got home, wanting to both one-up the price gougers and clean out my pantry of some dry goods.  I personally think this is much better than store-bought granola, which I don't eat except as an ice cream topping because it's usually way too sweet and full of oil.  This recipe is cobbled together from a few sources and uses applesauce and mashed pumpkin as the main binders.  It's not very sweet except for the dried fruit, but still spiced, very flavorful, and the millet adds a really unique texture.

Options for clumpage and textural variety.  When you're using a granola recipe that relies on high moisture/low-fat binders, sacrifices are unfortunately necessary to find a balance between clumps and crunch.  Either you bake the whole grains until the moisture is driven off (high crunch, low clumps), or turn some of it into flour and add oil which will hold more moisture in (low crunch, high clumps).

25% clumpage / 75% crunch - Leave the millet whole and use maple syrup to sweeten with no added oil/butter.  This is the easiest route since you can skip a step, but you'll get quite a lot of rogue non-clumped millet accumulating at the bottom of your storage containers.  This has it's own appeal of course but is kind of difficult to eat with a spoon.  Very crunchy with a texture of crushed Nature's Valley bars.

For 50% clumpage / 50% crunch - Grind 1/2 of the millet to a powder and add 1-2 tablespoons of melted coconut oil or butter.  The best of both worlds approach.

For 75-100% clumpage / low crunch - Grind 1/2 of the millet to a powder, use honey as a sweetener, substitute 1/2 cup of the rolled oats for wheat germ, and add 2-4 tablespoons melted coconut oil or butter.  This version is super clumpy but will be rather soft and similar to the texture of crumbled power bars.


There is also a very fine line between "crisp" and "burnt."  If your oven is uneven or runs hot, don't let it get the better of you: rotate your pans halfway through cooking, watch them carefully, and don't forget to check the underside.  Evening out the edges with a spatula helps too, since thin areas or lonesome bits will turn black before you know it.


Crunchy Millet Pumpkin Spice Granola
 Makes 16 cups (probably more if you don't snack while you're making this)
Total time: 1 hour (Active time 20-30 minutes)

  • 5 cups (400g) oats
  • 1 cup (200g) uncooked millet, divided
  • 1 cup (80g) unsweetened flaked coconut
  • 1 1/2 cup (150g) nuts/seeds (I used a mix of sunflower seeds, slivered almonds, and whole flax seeds)

  • 1 tablespoon pumpkin pie spice OR a mixture like:
    • 2 teaspoons cinnamon
    • 1/2 teaspoon ground cloves
    • 1/2 teaspoon ground ginger
    • 1/2 teaspoon nutmeg
    • 1/4 teaspoon cardamom
    • 1/4 teaspoon allspice
  • 1/2 teaspoon salt
  • 2 teaspoons vanilla extract
  • 3/4 cup (185g) unsweetened applesauce OR
    • 2 small granny smith apples, diced (peel on), simmered for 10 minutes with a large splash of water, and mashed with a fork
  • 3/4 cup (185g) mashed pumpkin (fresh or canned)
  • 1/2 cup (100g) sugar
  • 1/4 cup (85g) molasses
  • 1/4-1/2 cup (80-160g) maple syrup or honey
  • 2-4 tablespoons (25-50g) melted coconut oil or butter (optional)

  • 1 cup in-shell toasted pumpkin seeds
  • 1-2 cups chopped dried fruit (raisins, dates, dried cranberries, prunes, apricots, banana chips)

Preheat oven to 300F/150C and line two baking sheets with parchment paper.

Grind half of the millet in a spice grinder or processor until it turns into a flour.  Combine ground millet with the rest of the first 4 dry ingredients in a large bowl.  Combine spices and wet ingredients in a separate medium bowl and mix well.  Pour the wet mixture into the dry bowl and mix well with a spatula until the dry ingredients are coated.

Dump the mixture out onto the prepared baking sheets and spread it out into a single layer (don't leave the edges skimpy or they are more likely to burn).  Bake for 20-30 minutes until the top is a light golden brown.  Check the underside after 20 minutes.

Remove baking sheets from the oven.  Carefully flip granola over using a large spatula in sections (you might want to swap the center sections with the edges to ensure even baking).  Sprinkle in pumpkin seeds and chopped dried fruit over the top and loosely mix in, but don't break up the clumps.  Bake for another 10-15 minutes until golden brown and crisp.

Cool completely on the baking sheets before transferring to airtight containers.

Friday, March 18, 2011

10 Non-Financial Stock Tips

I've said it before and I'll say it again: soup is my favorite thing to make for mid-week lunches and dinners.  Soups optimize the healthy/filling/cheap/delicious quadrangle better than any of my other top lunch picks, as illustrated by this handy visual aid:


Most recipes call for some sort of flavored stock base, and while the store-bought liquid usually tastes great, it will typically run you about $2.99 per liter for the good stuff.  This can seriously add up if you're putting together a brothy soup and is an unreasonable expense if the rest of your ingredients are relatively cheap.  And the unhealthy-yet-still-tasty dry powder and cubes are usually loaded with questionable ingredients like MSG (even if it's labeled otherwise) and ungodly amounts of sodium.

The best way around this, of course, is to make your own stock.  And for the most part you can do this using your cooking trash.  I like to save the plastic bags from carrots or celery to add food scraps from normal day-to-day cooking, keeping the bags in the freezer when they're not in use.  When you have about two or three full bags, you can add the frozen scraps to a large pot, fill until covered with water, add seasonings, simmer for a few hours, and you're in business.  The more soup you make, the more scraps you'll have; it makes for quite a nice little self-perpetuating cycle.

But some scraps and seasonings are more equal than others when it comes to stock flavoring.  Here are some tips from my years of trial and error for creating the cheapest, most flavorful stock that requires the least amount of work and dishes:

1.  Good food scraps

  Meat bones are great (even buffalo wing remnants!) and are sold very cheaply at the butcher counter.  Good veg include onion peels, carrot ends and skin, celery ends and wilted pieces (including the leafy center), green parts and ends of leeks, spring onions, rinsed old mushrooms, stems of fresh herbs, the peel and knobby bits from fresh ginger, garlic, and the rinds of Parmesan or other hard cheese.

2.  Bad food scraps

 Squash and citrus peels are very bitter, all cruciferous vegetables taste rancid and smell like farts when you cook them for a long time, and anything with a high water content will completely disintegrate and discolor the stock (think spinach, lettuce, tomatoes, zucchini).

Most of these ingredients make for a great soup, but do not hold up well to long cooking.  Except the citrus peels of course.  Still not sure why I thought that was a good idea.


3.  Good seasonings

A couch surfing hippie once taught me that a splash of vinegar will really extract the maximum amount of flavor from your stock.  Actually I think he referred to magic collagen juju and not flavor specifically, but according to the internet, this isn't a completely baseless idea.

Whole spices will also add great flavor to the liquid (about 1/2-1 teaspoon of each will do); for maximum benefit, smash the spices using the flat side of a knife before adding them to the pot.  I always use black peppercorns, cloves (secret stock ingredient!), and bay leaves.  Dried chiles, cinnamon sticks, fennel seed, star anise, and coriander seed are also great additions. 

4.  Bad seasonings 

Ground spices and crumbled, dried herbs will add great flavor, but will also make your stock look dirty and give it a grittier texture since the small bits can't be filtered out unless you want to stuff around with multiple layers of cheesecloth or muslin and make a big mess.  Depending on the type of soup you want to make, this might not matter (eg. this would be fine for a thicker dark-colored soup).  I certainly agree with the Guardian: "personally, I reckon life's too short for consommés."

5.  The question of salt. 

I never add much salt to the stock itself, only to the dish I use it in, tasting as I go.  This is totally a personal preference, but I think it's much easier to control this way and you don't have to worry about the liquid over-reducing.  It's really easy to let sodium levels get completely out of hand when making soup, especially when using canned ingredients.  See Tip 10 regarding semantics and the non-necessity of preparing stock to be enjoyed on its own.

6.  Consider your end goal.  

I have made the mistake before of putting absolutely every scrap and seasoning I could find in the stock pot.  The result was something sort of bitter, sort of spicy with Asian flavors, and sort of cheesy.  Not recommended.  But some combinations that do make sense:

-All-purpose flavor base: Stick with the meat and onion/carrot/celery/leek/parsley scraps, and season with garlic, black peppercorns, whole cloves, and bay leaves.
-For a potato or cream-based soup: Add cheese rinds and fresh dill stems.
-For chili or other bean stew: Add dried chiles, coriander and cumin seeds, and fresh coriander and oregano stems.
-For braising meat: Add fennel seeds, star anise, fresh rosemary and thyme stems.
-For an Asian flavor base:  Add the hard unusable parts of lemongrass stems, dried chiles, fresh ginger peels, star anise, and fresh coriander stems.


7.  To brown or not to brown?

Some stock recipes suggest roasting or sautéing the vegetables and bones to brown them and generally develop a more complex flavor before adding water.  I'm definitely opposed to roasting on the basis that it creates another dirty dish (and cleaning roasting pans is the worst), and I'm also opposed to using fresh ingredients instead of scraps to make a broth.  Most soup recipes start off with sweating onions or some such anyway, why do it twice and why discard perfectly good vegetables?

Having tried it, I can say that the flavor difference is not measurable .  I am however intrigued by the easy-sounding German technique of slicing an onion in half and browning it before making stock.  Warrants experimentation. 

8.  Storage

The stock has to cool completely before refrigerating, so I will usually leave the covered pot out overnight to come to room temperature and strain and containerize in the morning (I've also forgotten and left veg stock out at room temperature for several days - still fine).  One-liter reused yogurt or clear takeaway containers are my favorite storage units and they conveniently hold the same amount as the cartons in the supermarket. 

I've never found a need for piddly plastic baggies or ice cube trays as recommended by some that expose the stock to the rest of your freezer's smells.  Need a quick defrost?  Microwave it for a minute to loosen the frozen cylinder and dump the rest into your soup pot.  The burner will do the work for you.

9.  Meat means more work.

Stock is a great use for your leftover carcasses from a Sunday roast, but the fattiness will add an extra step to the process since, unlike vegetable stock, you can't just strain the liquid and stick it in the freezer.  Return the strained liquid back to the pot and stick it in the refrigerator for a few hours to cool.  A white layer will solidify on the top that you can easily remove to de-fat the stock before freezing or using.  If you want to go really full circle, you can use the fat in any number of other delicious recipes.

10.  A note on semantics

The Kitchn does a great job at summing up the difference between broth and stock.  Basically broth is something that you can eat on its own with rich flavors, seasonings, and meat (not just the bones) while stock is more of a concentrated base on which to build a dish.  Many broth recipes call for fresh meats and veg which you cook to extract flavor and then discard, which, like the browned components in Tip 7, seems to me like a waste of perfectly good soup ingredients.  So use the bits you discard anyway to make stock, then add other ingredients and seasoning to finish the soup.  It's just plain efficient.


Want to give it a shot?  Here are some of my favorite stock-based recipes on the internet:

Carrot, Kumara, and Ginger Soup

Curried Split-Pea Soup

Super Delicious Zuppa Toscana

Hot and Sour Soup with Ginger

French Onion Soup

Wednesday, February 9, 2011

Trash Pizza

Clockwise from top left: avocado-mushroom-Sriracha, spinach-artichoke, red pepper-olive, and butternut squash-sage pizza

Friday pizza nights of my Trash Salad childhood were true genius, serving the dual purposes of temporarily pacifying my sister and my cravings for terrible food which we weren't ever allowed AND could also be used as a catch-all for random leftovers remaining at the end of the week.  My mom always made pizzas from scratch using frozen bread dough and while I love this idea, I'm not really blessed with the skills/patience required to stretch the tough pre-made dough out into perfect 16" thin crust circles.  This has resulted in some creative efforts on my part, like pizzas on a base of stale naan bread, tortillas, or rice cakes (not recommended for a toaster oven, fyi).

But!  I threw together a batch of from-scratch dough in under ten minutes over the weekend (using more or less the 101 Cookbooks recipe, a simplified riff on Peter Reinhart's Breadbaker's Apprentice) and don't think I'll be returning to quesa-pizzas anytime soon. 

Obviously the Kitchenaid mixer helped immensely, but it's really not that hard to knead dough for 5-7 minutes if you are less lazy.  Divide up dough, stick it in the fridge, leave for 1-3 days.  This step is the autolyse phase, or resting the dough so the flour can thoroughly hydrate and form strong and stretchable gluten proteins.  Take out of the fridge, leave for 2 hours on the counter, and you're in business.  The dough you create is super easy to instantly stretch out for topping.  Rolling pins and swearing not required.


Now, I am a thin-crust lover by trade.  If you prefer a more Chicago style variety (ick), I would recommend dividing the dough in the recipe into maybe 4 and not 6 sections and patting it straight onto a cookie sheet or whatever you're using because the more you lift the dough and get gravity involved, the more it will stretch the heck out of it.  You'll also have to bake thicker crust a lot longer to ensure it's cooked through, which can lead to burned toppings.

Some tips for making pizza dough from scratch:
    
  • From troubleshooting some of my own recipes, the biggest problem with the dough is usually too much flour.  This is especially a problem if you knead the dough by hand since it should be stickier than instinct would dictate (and dough stuck under your fingernails is more attention-grabbing than dough stuck to a dough hook).  So err on the side of caution and start with 3 1/2-4 cups of flour to 1 3/4 cups water, and keep your hands just lightly floured while kneading.  It's easy to add more flour in, but adding water to correct things isn't, especially if you're kneading by hand.
  • 
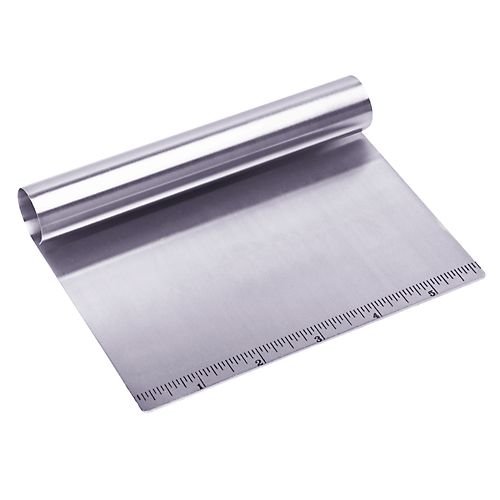
    Bash n' Chop
    Image via Amazon
  • Similarly, the dough will seem very sticky after you rest it on the counter before using.  Flour the counter and your hands well, then kind of form your dough pancake into a more manageable ball for transport.
  • I recently purchased a Bash 'n Chop similar to this one from one of those school fundraiser order form things that seem to be the way of the future.  Very handy and works great as a dough cutter and maneuverer/pastry scraper/counter cleaner.  If you are guilted into spending money for someone else's kids, why not get something useful out of it instead of yet another tin of caramel corn?
  • When moving your bases from the counter to your baking surface, don't over-work the dough.  I.e. if you overstretched and ended up with holes, it's easier to patch it up than to attempt to roll out the whole thing again.
  • If your base is truly vakakta and needs reforming, let the dough rest and work on another section in the meantime.  The dough will loosen back up after 15 minutes or so and you won't have to resort to the awful rolling pin method.


And some awesome toppings of late:

  • 1/2 roasted butternut squash mashed with 1 teaspoon dried sage, sliced roasted red pepper and onion
  • 1/2 ripe avocado mashed with 1/4 cup red sauce, fresh mozzarella, sliced mushrooms and green onions, Sriracha drizzle
  • olive-oiled crust, fresh spinach, ricotta cheese, kalamata olives, artichoke hearts
  • old spaghetti sauce, fresh mozzarella, sliced green olives and roasted red pepper

Sunday, January 30, 2011

Winter Veg Trash Hash

 
My good friend Jill visited over the weekend and in preparation for a spectacular festival of three of my favorite things (Beer, Bourbon, and Barbeque), a carby breakfast base was in order.  This hash seemed to do just the trick since we made it home in one piece after 4 hours of unlimited tastings.

I'm calling this a hash even though it is a vegetarian dish since it's a hodge podge of ingredients with fried potatoes and eggs - perfect for breakfast and so so easy.  I like grating the beets to make it nice and colorful and to mix up the texture a bit (also this way they don't really need to be peeled).  Adobo seasoning is a nice salty and flavorful kick to counter the sweetness of the potatoes and carrots though you can use chili powder or just salt and pepper if you prefer.  A bit of spicy sausage certainly wouldn't be out of place if you're not already prepping for an afternoon heart attack.

Check out this New York Times trend piece for other ideas for how to make your own $2 versions of some swanky $15 city brunch hashes.


Winter Vegetable Hash

Serve 2-4 (depending on how hungry you are)
Total time: 20-30 minutes (Active time 15 minutes)

  • 1-2 tablespoons butter
  • 1 onion, diced
  • 1 medium sweet potato, scrubbed and diced (the smaller the chunks, the faster they cook)
  • 2 small carrots, scrubbed and diced (ditto above)
  • 2 small beets, scrubbed and grated
  • Adobo seasoning or chili powder (or a clove of garlic, big pinch of salt and small pinches of black pepper, cumin, and oregano)
  • 1/2 bunch of greens (kale or beet), tough ribs removed
  • 2-4 eggs (as many people as are eating)
  • Cilantro or green onions for garnish (optional)

Saute onions in melted butter over medium heat in a heavy skillet.  While onions are cooking up, dice the sweet potato (leave the skin on), add it to the pan, and give it a stir.  Cover the pan to keep the heat in while you prep the rest of the vegetables. 

Chop the carrots and add to the pan, along with 1/4-1/2 cup water.  Grate and add beets, adding more water if the mixture looks too dry or starts to get excessively brown.  Cook for 5-10 minutes after the beets are added, or until the sweet potatoes and carrots are tender.  Season to taste with a few shakes of adobo or other spice mixture.

Slice your greens into thin ribbons and mix in when other vegetables are finished cooking, adding more water if the mixture looks dry.  After 2-3 minutes when greens are just cooked, make 2-4 small dents in the hash and crack an egg into each.  Cover the pan and turn heat to low.  Cook another 5 minutes or so until the whites are set but yolks are still runny.  Serve with cilantro/green onions and goat cheese on toast for a touch of class.

Tuesday, January 25, 2011

Basic Trash Lentil Soup


Lentil soup is for those days where you want something healthy and filling for dinner, tons of lunch leftovers, but don't want to stuff around with a trip to the store.  Brown lentils (or any kind really, but brown are typically cheapest) are a great pantry staple since they last forever and you are a straight-up fool if you pay more than $1.50 for a pound.

This recipe is infinitely adaptable and in The Trash Salad style is sort of half-based on the recipe on the package and half-based on things I had lying around.  The only unskippable minor ingredient is the vinegar or lemon juice which makes all the difference between a delicious soup and a bland pot of brown.  The acid makes the lentils have a satisfying meaty quality, which is really what you're aiming for when cooking vegetarian food (or in this case, vegetarianish).

Now, this soup is quick in the sense that it only takes maybe 10 minutes of chopping and throwing things in a pot followed by 30-45 minutes of beer-drinking downtime waiting for the lentils to simmer.  If you were clever and prone to planning ahead, you could cook them in advance and keep them in the fridge or freezer and then you'd be able to really make some magic.  Some recipes suggest that you rinse and pick through your lentils before cooking, but this is a massive waste of time.  In the interest of full disclosure, I have had a couple of pebble soup incidents over the years (only from bags, not the bulk bin lentils), but the ~5% chance of this happening does not outweigh the 15-20 minute time savings.

Tonight's version was a simple affair featuring bacon grease, smoked tofu, and spinach served with Franks hot sauce and a poached egg with a side of arrugula-based trash salad topped with sriracha mayo (oh, but more on that later).


Lentil Soup

Serves 6-8
Total time: 45 min-1 hour (Active time 10 minutes)
  • 1 1/2 tablespoons fat (bacon grease, butter, olive oil, whatever)
  • 1 onion, diced
  • 2 ribs celery, diced (OR the skinny core of the celery bunch, leaves included)
  • 2 skinny carrots, diced
  • 1 clove garlic, minced
  • 10 cups (2.5 L) water
  • 2 cups (or a 1lb bag) of brown lentils
  • 2 bay leaves (optional but I really like them)
  • Extra bits to add during cooking*
  • 2 tablespoons vinegar (any kind, or 3tbsp lemon juice)
  • salt to taste (start with 1/2 teaspoon)
  • Extra bits to add during the last few minutes of cooking**
  • Extra bits to add when serving***
Heat fat over medium heat in a large soup pot.  Saute onions (add first as you chop the rest), carrots, and celery for 5-10 minutes while you get your bits ready.  Add garlic and stir for another minute.

Add lentils, water, bay leaves, and your first lot of extra bits and stir.  Bring to a boil then cover and turn the heat to low.  Simmer for 30-45 minutes until lentils are as soft as you like.

Fish out your bay leaves (if using) and add vinegar, salt, and the second lot of extra bits and stir.  Taste, and reseason if desired.  Add more water if soup is too thick for your liking.

Serve with your third dose of extra bits.


Extra bits suggestions

*During cooking:  1-2 teaspoons dried herbs (oregano, basil, thyme), 1 teaspoon paprika, 1 tablespoon chili powder, 3-6 slices of diced cooked bacon or ham, half a block of tofu diced, 1 diced chipotle chili with 1 tsp adobo sauce, 2 tablespoons tomato paste (or ketchup in a pinch), 14 oz can of crushed tomatoes (you'll want to reduce the water if you do this), or substitute some or all of the water for broth or stock.  Extra winter veggies are also good, especially potatoes and butternut squash.

**Last few minutes of cooking:  fresh diced tomatoes, 1-2 cups of thinly sliced spinach or kale, frozen edamame, chopped fresh cilantro or basil

***Serving:  a poached egg, cooked rice, few tablespoons of greek yogurt or sour cream, salsa, garlicky croutons, flavorful crumbled or shredded cheese, hot sauce, chives, green onions, chili flakes, french fried onions, sliced avocado

Wednesday, January 12, 2011

Trash Mac and Cheese

Image via Whole Foods

Every so often I forget that it is a bad idea and stop at the supermarket before I've had dinner.  This inevitably leads to ridiculous purchases that I wouldn't think to make with a normal blood sugar level.

Most recently, this purchase was a box of 365 Organic Shells and Cheese.  I hear you. "Ew! No! Over-processed crap!"  That may be, but the list of ingredients wasn't too appalling, and I later learned that this particular brand had triumphed in several internet taste tests.  Apparently the zeitgeist of late 2009 was processed mac and cheese comparisons.

The best thing about this purchase was all of the flashbacks I had to my college cooking days where everything was "make more with less in less time."  You can gussy up prepared mac and cheese from a box with any number of extra bits you have lying around in no time at all, which generally can serve to assuage your guilt over eating it in the first place.

Some of my favorite trash boxed mac additions include:
  • sliced roasted red pepper
  • 1 cup frozen peas
  • 1/2 bunch of sauteed greens with a few cloves of garlic and red chili flakes
  • halved cherry tomatoes
  • can of water-packed tuna
  • few tablespoons of capers
  • diced scallions
And some themed trash mac options:
  • for some south of the border flair:  few tablespoons of sliced black olives, 1/2 a diced green chile, with 1-2 tsp chili powder, dollop of salsa
  • for added brightness:  zest of a lemon and fresh herbs (basil, coriander, chives, or parsley)
  • for when you're not entertaining:  cut up hot dogs or sausages, few tsp mustard, tablespoon of ketchup
  • for a taste of Scandinavia:  1-2 oz smoked salmon, fresh dill
  • for a restauranty meal:  1/4-1/2 cup of a strongly flavored cheese (like sharp cheddar, gorgonzola, or blue), crumbled cooked bacon, topped with 1/4 cup of breadcrumbs and baked until browned

Last week's dinner variation included frozen peas, kale, capers, cloves of mushed roasted garlic, a scallion, and red chili flakes.  I probably could have gotten away with at least three fewer ingredients, but why only go halfway?


I should mention that you really need to use the kind with white and not yellow cheese if you want your dinner to look more delicious and less like vomit.  Unless you are going for the hot dog/mustard/ketchup combo in which case all bets are off anyway.

Monday, January 3, 2011

The Trash Salad

The concept of the Trash Salad was born in October 2010 when my dear friend, having witnessed what I was eating for second breakfast, declared that it looked as though someone's picnic leftovers had been tossed in a rubbish bin, mixed up, and dumped in my bowl.  This was a near-perfect description of my meal which from memory consisted of ripped up hot dogs rescued from the previous day's barbeque, crumbled up cheese slices, cold grilled summer squash, jalapeno olives, and crushed chips over spinach and drizzled with creamy horseradish sauce and mustard. 

This salad was obviously delicious and continues to haunt my dreams, but I also make other more conventional things to eat, some of which require recipes and even utensils to prepare.  Often these more technical pursuits get lost among the everyday eat-down-the-fridge meals, hence The Trash Salad aims to keep things organized and document some successes and failures along the way.

The goal of this little project is threefold:
WV Doubledown Extravaganza
  • to learn a little something about web design.  This seems to be a useful and marketable skill that I have maintained active ignorance about since the olden days of livejournaling.
  • to pressure me to take more photos.  I have a nice camera that has been used on fewer than 10 occasions since it was given to me almost 2 years ago.  As an example of how terrible I am at this,  the only photograph I took during a memorable trip to West Virginia last year ->
  • to keep track of things I cook in a searchable format.  I once dreamt of using a cute little spiral-bound notebook to write down recipes with modifications and illustrations to have in one place and eventually pass on to my kids like good mamas do.  Unfortunately, handwriting things takes an unreasonable amount of time and any blank white surface in my kitchen is a prime target for red wine/tomato sauce/rogue bacon grease.
As a notorious starter but not keeper upper, I don't have high hopes of maintaining a regular posting habit, but we'll see what comes of this.  Other interests of mine include unnecessary food wastage, DIY everything, and deciphering food science and policy so I will probably be getting on my soapbox time and again.  And as a serious cheapskate working in New York City, I'll also be sharing tips on how to not go broke when all you want to do is spend money on awesome things and restaurants.

Incidentally, Park and Sixth Comfort Food in Hoboken, NJ has a Garbage Salad on the menu which sounds like it's filled with great veggies and may require further research.  But no hot dogs unfortunately.